Back up Windows Server to Azure
You can use Azure Backup to protect your Windows Server from corruptions, attacks, and disasters. Azure Backup provides a lightweight tool known as the Microsoft Azure Recovery Services (MARS) agent. The MARS agent is installed on the Windows Server to protect files and folders, and server configuration info via Windows Server System State. This tutorial explains how you can use MARS Agent to back up your Windows Server to Azure. In this tutorial you learn how to:
- Download and set up the MARS Agent
- Configure back up times and retention schedule for your server’s backups
- Perform an ad-hoc back up
Log in to Azure
Log in to the Azure portal at http://portal.azure.com.
Create a Recovery Services vault
Before you can back up Windows Server, you must create a place for the backups, or restore points, to be stored. A Recovery Services vault is a container in Azure that stores the backups from your Windows Server. Follow the steps below to create a Recovery Services vault in the Azure portal.
-
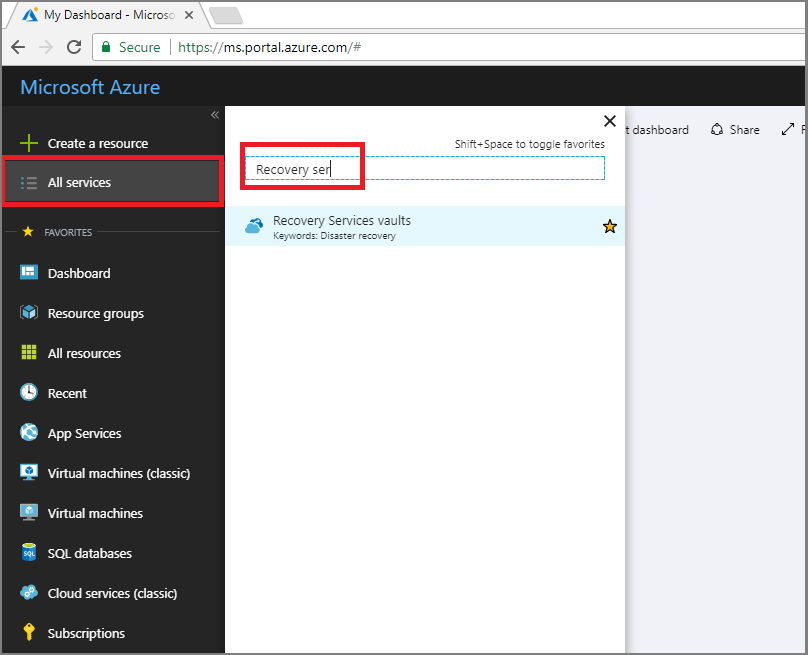
On the left-hand menu, select All services and in the services list, type Recovery Services. Click Recovery Services vaults.
-
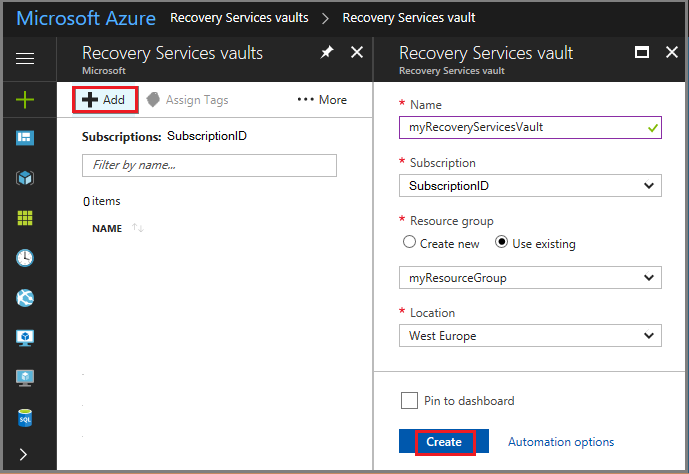
On the Recovery Services vaults menu, click Add.
-
In the Recovery Services vault menu,
- Type myRecoveryServicesVault in Name.
- The current subscription ID appears in Subscription.
- For Resource group, select Use existing and choose myResourceGroup. If myResourceGroup doesn't exist, select Create New and type myResourceGroup.
- From the Location drop-down menu, choose West Europe.
- Click Create to create your Recovery Services vault.
Once your vault is created, it appears in the list of Recovery Services vaults.
Download Recovery Services agent
The Microsoft Azure Recovery Services (MARS) agent creates an association between Windows Server and your Recovery Services vault. The following procedure explains how to download the agent to your server.
-
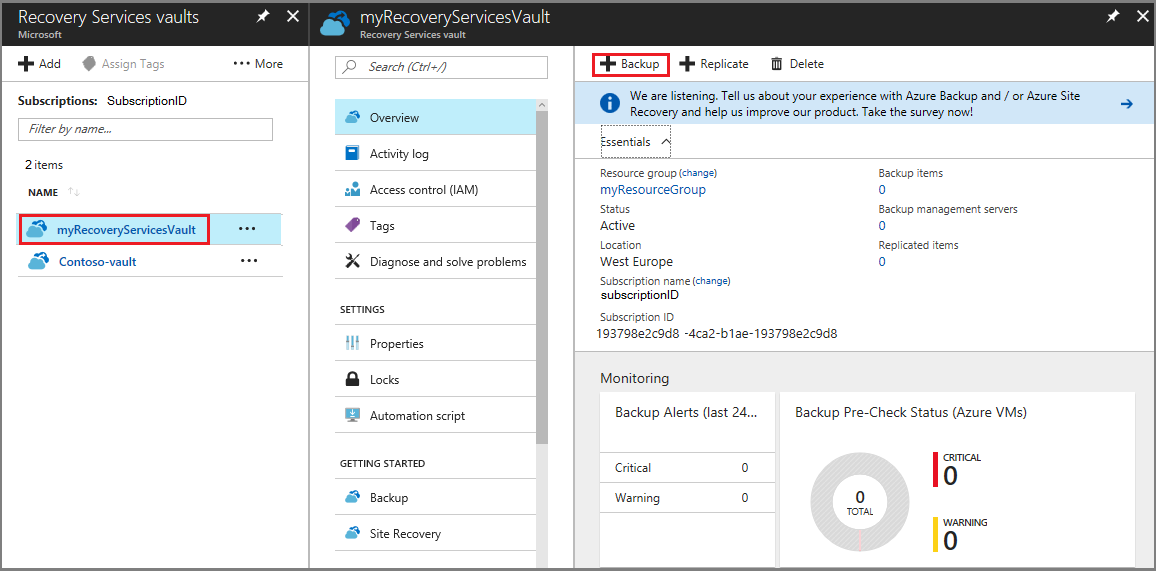
From the list of Recovery Services vaults, select myRecoveryServicesVault to open its dashboard.
-
On the vault dashboard menu, click Backup.
-
On the Backup Goal menu:
- for Where is your workload running?, selectOn-premises,
- for What do you want to backup?, select Files and folders and System State

-
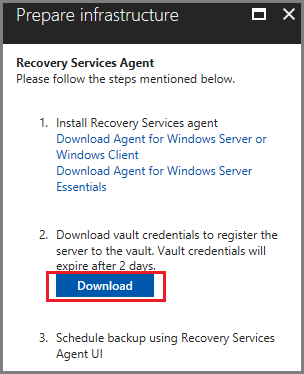
Click Prepare Infrastructure to open the Prepare infrastructure menu.
-
On the Prepare infrastructure menu, click Download Agent for Windows Server or Windows Client to download the MARSAgentInstaller.exe.

The installer opens a separate browser and downloads MARSAgentInstaller.exe.
-
Before you run the downloaded file, click the Downloadbutton on the Prepare infrastructure blade to download and save the Vault Credentials file. This file is required for connecting the MARS Agent with the Recovery Services Vault.
Install and register the agent
- Locate and double-click the downloaded MARSagentinstaller.exe.
-
The Microsoft Azure Recovery Services Agent Setup Wizardappears. As you go through the wizard, provide the following information when prompted and click Register.
- Location for the installation and cache folder.
- Proxy server info if you use a proxy server to connect to the internet.
-
Your user name and password details if you use an authenticated proxy.
-
At the end of the wizard, click Proceed to Registration and provide the Vault Credentials file you downloaded in the previous procedure.
-
When prompted, provide an encryption passphrase to encrypt backups from Windows Server. Save the passphrase in a secure location as Microsoft cannot recover the passphrase if it is lost.
-
Click Finish.
Configure Backup and Retention
You use the Microsoft Azure Recovery Services agent to schedule when backups to Azure, occur on Windows Server. Execute the following steps on the server where you downloaded the agent.
-
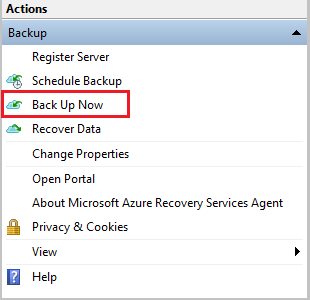
Open the Microsoft Azure Recovery Services agent. You can find it by searching your machine for Microsoft Azure Backup.
-
In the Recovery Services agent console, click Schedule Backupunder the Actions Pane.

-
Click Next to navigate to the Select Items to Back up page.
-
Click Add Items and from the dialog box that opens, select System State and files or folders that you want to back up. Then click OK.
-
Click Next.
-
On the Specify Backup Schedule (System State) page, specify the time of the day, or week when backups need to be triggered for System State and click Next
-
On the Select Retention Policy (System State) page, select the Retention Policy for the backup copy for System State and click Next
- Similarly, select the backup schedule and retention policy for selected files and folders.
- On the Choose Initial Back up Type page, leave the option Automatically over the network selected, and then click Next.
- On the Confirmation page, review the information, and then click Finish.
- After the wizard finishes creating the backup schedule, click Close.
Perform an ad-hoc back up
You have established the schedule when backup jobs run. However, you have not backed up the server. It is a disaster recovery best practice to run an on-demand backup to ensure data resiliency for your server.
-
In the Microsoft Azure Recovery Services agent console, click Back Up Now.
-
On the Back Up Now wizard, select one from Files and Folders or System State that you want to back up and click Next
- On the Confirmation page, review the settings that the Back Up Now wizard uses to back up your server. Then click Back Up.
- Click Close to close the wizard. If you close the wizard before the back up process finishes, the wizard continues to run in the background.
- After the initial backup is completed, Job completed status appears in Jobs pane of the MARS agent console.